Custom Archive Page for Your WordPress Themes
Why We Need the Archive Page
In WordPress Themes, you get to work with a range of different page templates and structures in the standard configuration. Looking at the directory listing of the default theme at the time of writing, Twenty Fifteen, we find the following:
- 404 error page,
- archive page
- image attachments page,
- index page (the main page),
- default page template (for pages),
- search results page,
- single post and attachment pages.
Despite their different purposes, all of these pages are really similar in structure, and they usually only differ in a couple of places and several lines of code. In fact, the only visible difference between the index page and the archive page is the additional header at the top, which changes according to the particular page being viewed.

The only built-in way to showcase the archive links on a WordPress website is with a widget. So, if you want to allow visitors to dig into the archive in any clear way, you’d probably have to devote a whole sidebar just to the archive (just to be able to capture different types of organization, such as a date-based archive, a category archive, a tag archive, an author archive and so on).
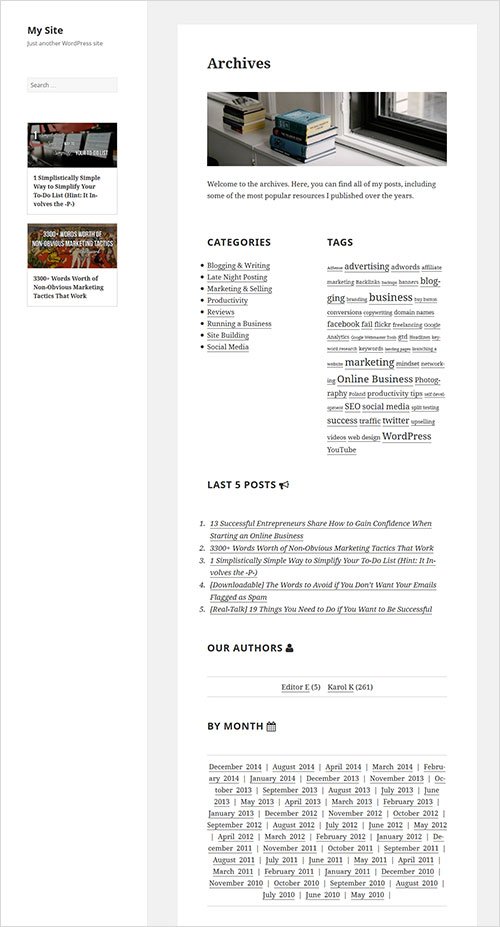
So, what we really need here is a middleman, a page that welcomes the visitor, explains that they’re in the archive and then points them to the exact piece of content they are interested in or suggests some popular content.
That is why we’re going to create a custom archive page.
How To Build It
Here’s what we’re going to do in a nutshell. Our custom archive page will be based on a custom page template. This template will allow us to do the following:
- include a custom welcome message (may contain text, images, an opt-in form, etc. — standard WordPress stuff);
- list the 15 latest posts (configurable);
- display links to the author archive;
- display links to the monthly archive;
- add additional widget areas (to display things like the most popular content, categories, tags).
Lastly, the page will be responsive and will not depend on the current theme of the website it’s being used on. You can use the approach presented here with any other wordpress themes.
Getting Started With The Main File
The best model on which to build your archive page is the page.php file of your current theme, for a couple of reasons:
- Its structure is already optimized to display custom content within the main content block.
- It’s probably one of the simplest page templates in your theme’s structure.
Therefore, I’m going to make a copy and call it tmpl_archives.php.
(Make sure not to call your page something like page-archives.php. All file names starting with page- will be treated as new page templates within the main file hierarchy of WordPress themes. That’s why we’re using the prefix tmpl_ here.)
Next, all I’m going to do is change one single line in that file:
<?php get_template_part( 'content', 'page' ); ?>
We’ll change that to this:
<?php get_template_part( 'content', 'tmpl_archives' ); ?>
All this does is fetch the right content file for our archive page.
If you want, you could remove other elements that seem inessential to your archive page (like comments), but make sure to leave in all of the elements that make up the HTML structure. And in general, don’t be afraid to experiment. After all, if something stops working, you can easily bring back the previous code and debug from there.
Also, don’t forget about the standard custom template declaration comment, which you need to place at the very beginning of your new file (in this case, tmpl_archives.php):
<?php /* Template Name: Archive Page Custom */ ?>
After that, what we’re left with is the following file structure (with some elements removed for readability.
<?php /* Template Name: Archive Page Custom */ get_header(); ?> <div class="clear"></div> </header> <!-- / END HOME SECTION --> <div id="content" class="site-content"> <div class="container"> <div class="content-left-wrap col-md-9"> <div id="primary" class="content-area"> <main id="main" class="site-main" role="main"> <?php while ( have_posts() ) : the_post(); // standard WordPress loop. ?> <?php get_template_part( 'content', 'tmpl_archives' ); // loading our custom file. ?> <?php endwhile; // end of the loop. ?> </main><!-- #main --> </div> <!-- #primary --> </div> <div class="sidebar-wrap col-md-3 content-left-wrap"> <?php get_sidebar(); ?> </div> </div> <!-- .container --> <?php get_footer(); ?>
Next, let’s create the other piece of the puzzle — a custom content file. We’ll start with the content-page.php file by making a copy and renaming it to content-tmpl_archives.php.
In this file, we’re going to remove anything that’s not essential, keeping only the structural elements, plus the basic WordPress function calls:
<?php /** * The template used to display archive content */ ?> <article id="post-<?php the_ID(); ?>" <?php post_class(); ?>> <header class="entry-header"> <h1 class="entry-title"><?php the_title(); ?></h1> </header> <!-- .entry-header --> <div class="entry-content"> <?php the_content(); ?> <!-- THIS IS WHERE THE FUN PART GOES --> </div> <!-- .entry-content --> </article> <!-- #post-## -->
The placeholder comment visible in the middle is where we’re going to start including our custom elements.
ADDING A CUSTOM WELCOME MESSAGE
This one’s actually already taken care of by WordPress. The following line does the magic:
<?php the_content(); ?>
ADDING NEW WIDGET AREAS
Let’s start this part by setting up new widget areas in WordPress using the standard process. However, let’s do it through an additional functions file, just to keep things reusable from theme to theme.
So, we begin by creating a new file, archives-page-functions.php, placing it in the theme’s main directory, and registering the two new widget areas in it:
if(!function_exists('archives_page_widgets_init')) : function archives_page_widgets_init() { /* First archive page widget, displayed to the LEFT. */ register_sidebar(array( 'name' => __('Archives page widget LEFT', 'zerif-lite'), 'description' => __('This widget will be shown on the left side of your archive page.', 'zerif-lite'), 'id' => 'archives-left', 'before_widget' => ' <div class="archives-widget-left">', 'after_widget' => '</div> ', 'before_title' => ' <h1 class="widget-title">', 'after_title' => '</h1> ', )); /* Second archive page widget, displayed to the RIGHT. */ register_sidebar(array( 'name' => __('Archives page widget RIGHT', 'zerif-lite'), 'description' => __('This widget will be shown on the right side of your archive page.', 'zerif-lite'), 'id' => 'archives-right', 'before_widget' => ' <div class="archives-widget-right">', 'after_widget' => '</div> ', 'before_title' => ' <h1 class="widget-title">', 'after_title' => '</h1> ', )); } endif; add_action('widgets_init', 'archives_page_widgets_init');
Next, we’ll need some custom styling for the archive page, so let’s also “enqueue” a new CSS file:
if(!function_exists('archives_page_styles')) : function archives_page_styles() { if(is_page_template('tmpl_archives.php')) { wp_enqueue_style('archives-page-style', get_template_directory_uri() . '/archives-page-style.css'); // standard way of adding style sheets in WP. } } endif; add_action('wp_enqueue_scripts', 'archives_page_styles');
This is a conditional enqueue operation. It will run only if the visitor is browsing the archive page.
Also, let’s not forget to enable this new archives-page-functions.php file by adding this line at the very end of the current theme’s functions.php file:
require get_template_directory() . '/archives-page-functions.php';
Finally, the new block that we’ll use in our main content-tmpl_archives.php file is quite simple. Just place the following right below the call to the_content();:
<?php /* Enabling the widget areas for the archive page. */ ?> <?php if(is_active_sidebar('archives-left')) dynamic_sidebar('archives-left'); ?> <?php if(is_active_sidebar('archives-right')) dynamic_sidebar('archives-right'); ?> <div style="clear: both; margin-bottom: 30px;"></div> <!-- clears the floating -->
All that’s left now is to take care of the only missing file, archives-page-style.css. But let’s leave it for later because we’ll be using it as a place to store all of the styles of our custom archive page, not just those for widgets.
LISTING THE 15 LATEST POSTS
Here’s how we’re going to do it:
- Setting the number of posts will be possible through the custom field
archived-posts-no. - If the number given is not correct, the template will default to displaying the 15 latest posts.
Below is the code that does this. Place it right below the previous section in the content-tmpl_archives.php file, the one that handles the new widget areas.
<?php $how_many_last_posts = intval(get_post_meta($post->ID, 'archived-posts-no', true)); /* Here, we're making sure that the number fetched is reasonable. In case it's higher than 200 or lower than 2, we're just resetting it to the default value of 15. */ if($how_many_last_posts > 200 || $how_many_last_posts < 2) $how_many_last_posts = 15; $my_query = new WP_Query('post_type=post&nopaging=1'); if($my_query->have_posts()) { echo ' <h1 class="widget-title">Last '.$how_many_last_posts.' Posts <i class="fa fa-bullhorn" style="vertical-align: baseline;"></i></h1> '; echo ' <div class="archives-latest-section"> <ol>'; $counter = 1; while($my_query->have_posts() && $counter <= $how_many_last_posts) { $my_query->the_post(); ?> <li><a href="<?php the_permalink() ?>" rel="bookmark" title="Permanent Link to <?php the_title_attribute(); ?>"><?php the_title(); ?></a></li> <?php $counter++; } echo '</ol> </div> '; wp_reset_postdata(); } ?>
Basically, all this does is look at the custom field’s value, set the number of posts to display and then fetch those posts from the database using WP_Query();. I’m also using some Font Awesome icons to add some flare to this block.
DISPLAYING LINKS TO THE AUTHOR ARCHIVES
(This section is only useful if you’re dealing with a multi-author blog. Skip it if you are the sole author.)
This functionality can be achieved with a really simple block of code placed right in our main content-tmpl_archives.php file (below the previous block):
<h1 class="widget-title">Our Authors <i class="fa fa-user" style="vertical-align: baseline;"></i></h1> <div class="archives-authors-section"> <ul> <?php wp_list_authors('exclude_admin=0&optioncount=1'); ?> </ul> </div>
DISPLAYING LINKS TO THE MONTHLY ARCHIVES
I’m including this element at the end because it’s not the most useful one from a reader’s perspective. Still, having it on your archive page is nice just so that you don’t have to use widgets for the monthly archive elsewhere.
Here’s what it looks like in the content-tmpl_archives.php file:
<h1 class="widget-title">By Month <i class="fa fa-calendar" style="vertical-align: baseline;"></i></h1> <div class="archives-by-month-section"> <?php wp_get_archives('type=monthly&format=custom&after= |'); ?> </div>
THE COMPLETE ARCHIVE PAGE TEMPLATE
Just for clarity, let’s look at our complete content-tmpl_archives.php file, which is the main file that takes care of displaying our custom archive:
<?php /** * The template used to display archive content */ ?> <article id="post-<?php the_ID(); ?>" <?php post_class(); ?>> <header class="entry-header"> <h1 class="entry-title"><?php the_title(); ?></h1> </header> <!-- .entry-header --> <div class="entry-content"> <?php the_content(); ?> <?php if(is_active_sidebar('archives-left')) dynamic_sidebar('archives-left'); ?> <?php if(is_active_sidebar('archives-right')) dynamic_sidebar('archives-right'); ?> <div style="clear: both; margin-bottom: 30px;"></div> <!-- clears the floating --> <?php $how_many_last_posts = intval(get_post_meta($post->ID, 'archived-posts-no', true)); if($how_many_last_posts > 200 || $how_many_last_posts < 2) $how_many_last_posts = 15; $my_query = new WP_Query('post_type=post&nopaging=1'); if($my_query->have_posts()) { echo ' <h1 class="widget-title">Last '.$how_many_last_posts.' Posts <i class="fa fa-bullhorn" style="vertical-align: baseline;"></i></h1> '; echo ' <div class="archives-latest-section"> <ol>'; $counter = 1; while($my_query->have_posts() && $counter <= $how_many_last_posts) { $my_query->the_post(); ?> <li><a href="<?php the_permalink() ?>" rel="bookmark" title="Permanent Link to <?php the_title_attribute(); ?>"><?php the_title(); ?></a></li> <?php $counter++; } echo '</ol> </div> '; wp_reset_postdata(); } ?> <h1 class="widget-title">Our Authors <i class="fa fa-user" style="vertical-align: baseline;"></i></h1> <div class="archives-authors-section"> <ul> <?php wp_list_authors('exclude_admin=0&optioncount=1'); ?> </ul> </div> <h1 class="widget-title">By Month <i class="fa fa-calendar" style="vertical-align: baseline;"></i></h1> <div class="archives-by-month-section"> <?php wp_get_archives('type=monthly&format=custom&after= |'); ?> </div> </div> <!-- .entry-content --> </article> <!-- #post-## -->
THE STYLE SHEET
Lastly, let’s look at the style sheet and, most importantly, the effect it gives us.
Here’s the archives-page-style.css file:
.archives-widget-left { float: left; width: 50%; } .archives-widget-right { float: left; padding-left: 4%; width: 46%; } .archives-latest-section { } .archives-latest-section ol { font-style: italic; font-size: 20px; padding: 10px 0; } .archives-latest-section ol li { padding-left: 8px; } .archives-authors-section { } .archives-authors-section ul { list-style: none; text-align: center; border-top: 1px dotted #888; border-bottom: 1px dotted #888; padding: 10px 0; font-size: 20px; margin: 0 0 20px 0; } .archives-authors-section ul li { display: inline; padding: 0 10px; } .archives-authors-section ul li a { text-decoration:none; } .archives-by-month-section { ext-align: center; word-spacing: 5px; } .archives-by-month-section p { border-top: 1px dotted #888; border-bottom: 1px dotted #888; padding: 15px 0; } .archives-by-month-section p a { text-decoration:none; } @media only screen and (max-width: 600px) { .archives-widget-left { width: 100%; } .archives-widget-right { width: 100%; } }
How To Integrate This Template With Any Theme
- Take the
archives-page-style.cssfile and thearchives-page-functions.phpfile that we built here and put them in your theme’s main directory. - Edit the
functions.phpfile of your theme and add this line at the very end:require get_template_directory() . '/archives-page-functions.php';. - Take the
page.phpfile of your theme, make a copy, rename it, change theget_template_part()function call toget_template_part( 'content', 'tmpl_archives' );, and then add the main declaration comment at the very beginning:/* Template Name: Archive Page Custom */. - Take the
content-page.phpfile of your theme, make a copy, rename it tocontent-tmpl_archives.php, and include all of the custom blocks that we created in this guide right below thethe_content();function call. - Test and enjoy.
At last, I will show you what it looks like in the default Twenty Fifteen theme: