How to Use Slider Revolution in WordPress Themes
In most of our premium wordpress themes, there are the popular plugin Slider-Revolution pre-packaged with the theme. Many customer didn’t how to start using it, so we provide this guidance and hope it is useful.
PLUGIN GLOBAL SETTINGS
Slider Revolution comes with some “Global Settings” that will get applied to all sliders. These settings are meant to help resolve potential conflicts with themes and other plugins, and also give you some custom control of how the plugin works with your site.
Here’s a breakdown of the options listed in the Global Settings:
-
View Plugin Permissions: Choose who can access the plugin’s admin when logged into WordPress
- Admin
- To Editor, Admin
- Author & Editor & Admin
-
Include RevSlider libraries globally: Enable/Disable tooltips when hovering over parts of the plugin’s admin
- ON: Add CSS and JS Files to all pages. Always use this option if the slider has been added to a page using PHP or in a Widget.
- OFF: CSS and JS Files will be only loaded on Pages where any [rev_slider] shortcode exists. This option can be used if you’ve added the slider to your web page via shortcode. If you’ve added the slider to your site via PHP or Widget, and would still only like the slider’s CSS and JS to be added to pages where a slider is present, use the Pages to include RevSlider libraries option below.
- Pages to include RevSlider libraries: A list of page ID’s (separated by commas) where you’d like to include the slider’s CSS and JS. This is a good option if you’re adding sliders to your web pages via PHP or Widget, and want to only include the slider’s CSS and JS on pages where slider’s actually exist.
- Include RevSlider libraries globally: Use this option if you’d like the slider’s JS to load in the page’s footer. This is often helpful for speeding up page loading, and also useful for resolving conflicts (i.e. when a page is erroneously loading two copies of jQuery).
- Enable Markup Export option: Adds a button to the slider’s main admin listing that will allow you to export a WP slider for usage in a static HTML site. After activating this option, click “Update” and then refresh the page and you’ll see the new “Export HTML” button listed next to your slider:
- Use Own hammer.js: “Hammer” is a popular script used for mobile touch-swipe. If your theme or another plugin is already loading its own copy of “Hammer”, set this option to Off to make sure the script is only loaded into the page once. This is also useful for solving issues when the slider is working correctly on desktop but not mobile, as loading two copies of “Hammer” into the page is usually the issue.
CREATING A NEW SLIDER
To create a new slider, visit the plugin’s main admin page, and click the Create New Slider button:
Next, give the slider a custom name and “alias”
Finally, scroll to the bottom of the page and click the Create Slider button.
SPECIAL NOTE: If you’d also like to adjust your slider’s main settings, you can do that before clicking the “Create Slider” button. But this isn’t necessary to create a new slider, as you can adjust your slider’s main settings after your new slider is officially created.
The page will then be redirected to the plugin’s main admin page, where you’ll see you’re new slider listed:
You’re now ready to start customizing your slider’s main settings.
SLIDER MAIN SETTINGS
Once you’ve created your first slider, the next step is to choose your slider’s main settings. From your slider’s list in the plugin’s main admin page, click the “Settings” button shown here:
You’ll then be taken back to the page where you first named your slider. Here you’ll find two columns on the left and right side, each containing several sections for your slider’s main settings:
Main Slider Settings
- Slider Title: The name of your slider. Can be anything, and is only used for admins to keep track of their sliders.
- Slider Alias: Will represent the slider’s shortcode alias. Use lower-case letters, and avoid spaces and special characters (dashes and underscores ok).
- Slider Shortcode: This value will populate automatically based on the Slider Alias you’ve chosen. Copy and paste this into one of your pages/posts WYSIWYG editor for the easiest way to add a slider to one of your pages.
-
Source Type: Choose between a regular slider or a post-based slider.
- Gallery: The default option. If you plan to build a slider manually through the slider’s admin, choose this option.
- Posts: If you want your slider’s content to be based on a set of posts or pages, choose this option.
- Specific Posts: Choose specific posts/pages you wish to include as your slider’s main content source.
-
Slider Layout:
- Auto Responsive: Usually the best option for most websites. The slider will always “respond” based on the slider’s immediate parent container (the HTML container of your theme where the slider is placed).
- Fixed: A non-responsive slider (slider’s size will never change, use this option if your website is not responsive.
- Custom: If you need a “responsive” slider, it’s usually best to use the “Auto Responsive” option. But the Custom option is useful if you need more advanced control over how the slider’s responsive behavior. There are 6 “responsive points” you can choose:
- Full Screen: The slider’s size will equal the window’s entire width and entire height. For example, if the screen size is 1024×768, the slider’s display size will also be 1024×768, and will adjust dynamically depending on the user’s screen size. When this option is chosen, you’ll see some additional options that will help you position the slider on the page in relation to other page content:
- Unlimited Height: (only available when “Auto Responsive” is selected)
- Force Full Width: (only available when “Auto Responsive” is selected) Use this option to force the slider to be full-width on your web page.
-
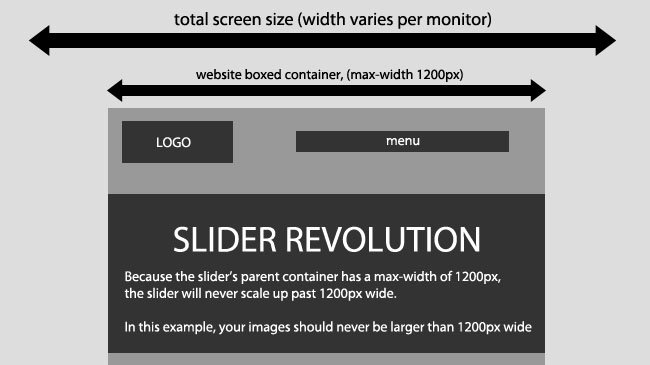
Grid Settings: Represents the slider’s initial size. If the “Slider Layout” (#5 above) is “Fixed”, these numbers will represent the size of your slider. If the Slider Layout is “responsive” (“Custom”, “Auto Responsive” or “Full Screen”), the slider will “respond” based on these initial values.
- Grid Width: The Slider’s initial width (required value)
- Grid Height: The slider’s initial height (required value)
- Layout Example: A visualization representing the slider’s layout options.
- Save Settings: Save the slider’s currently selected settings.
- Delete Slider: Delete the current slider (this action is permanent!)
- Close: Return to plugin’s main admin page.
- Edit Slides: Shortcut button to edit the slider’s individual slides.
- Preview: A popup modal will load allowing you to preview the current slider (a slider must have some slides added to it before a preview is possible)
That’s all of the basic Slider Creating, thank you for reading.