How to Use WordPress Custom Fields
emes
What are WordPress Custom Fields?
Custom Fields are a form of meta-data that allows you to store arbitrary information with each WordPress post. While this does not sound so powerful, it is the single most powerful component of WordPress posts and content types (aka post types). This meta-data is handled with key/value pairs. The key is a “name” which identifies the specific field thus it is a constant and should stay the same for all posts however you can use the same key multiple times within one post. The value is the information that will be displayed for the field when you call it in your WordPress theme thus it can change with each post.
Examples
To start off, you’ll need to gather what a custom field truly is. What better way than seeing some examples?
Custom fields can include almost any value you can think of if implemented correctly. Some examples include but are not limited to:
- Custom Thumbnails
- Status Updates
- Advanced Links
- Titles and Subtitles
- Author Information
- Weather Statuses
- Custom Times and Dates
- many more!
If you take a look at the WordPress admin area you’ll notice that when you click Add New under the Posts menu a field below the post content text area is titled Custom Fields. There’s a chance you won’t see this feature. If not, look to the top right of your window and click Screen Options. From there make sure the Custom Fields option is selected. Once selected you should see it at the bottom of your screen like I have below.
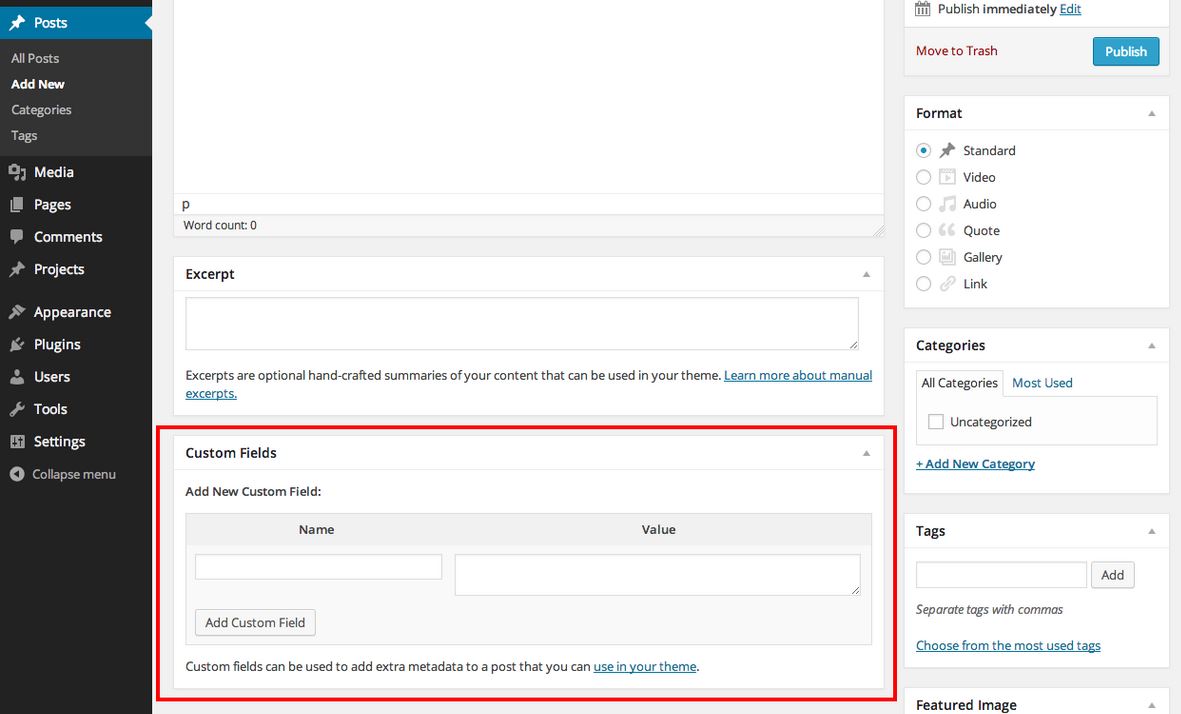
The custom fields section contains two input fields labeled Name and Value. The name input is usually the identifier that which once used, triggers WordPress to display the content within the value field.
An example could be Name: contact-link and Value: Contact Us.
Once the custom field is added it should display in an area pre-defined within your WordPress theme. Just remember custom fields don’t display by default unless your theme has been customized to do so. I will show you how to do this in a bit.
Extending Your Theme With Custom Fields
Say a group of unique images or songs for example. Inside your custom field panel you can add as many as you like. As long as the custom field name is the same you can even display the group of custom fields in one simple line code.
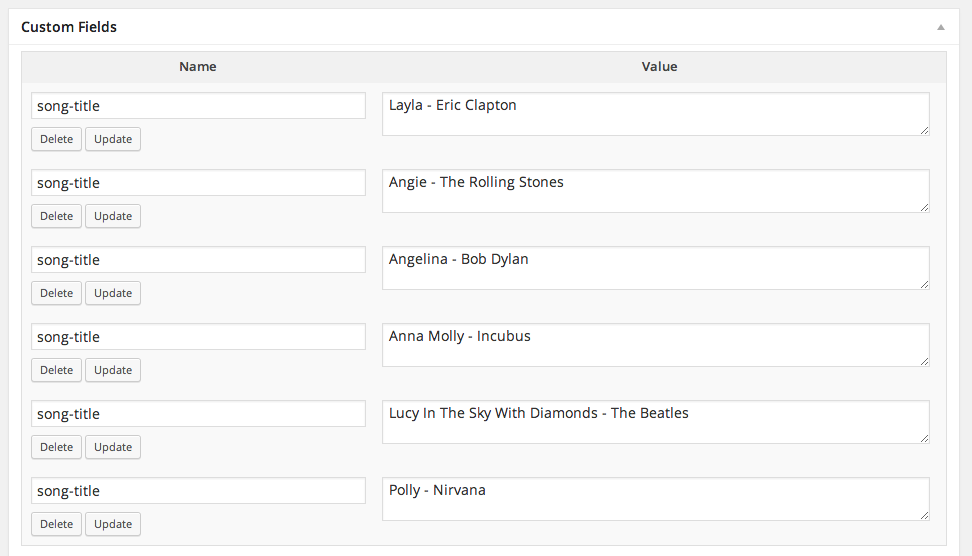
I’ve created a new post called “Songs Named After Girls”. I have also added a small amount of content and six new custom field entries.
The name of our custom field is song-title and our key is a song title with the artist who produced it.
Now we need to include the code to display the song-title custom field into our posts. If you foresee having a lot of posts like this one it might be a good opportunity to create a custom post type so you can build a custom template just for this type of post but for the sake of this tutorial we will just be modifying our single.php file again.
Open your single.php file and add the code below. Make sure it’s added within the area of your main content.
<?php $songs = get_post_meta($post->ID, 'song-title', false); ?> <ul> <?php foreach($songs as $song) { echo '<li>'.$song.'</li>'; } ?> </ul>
The code above successfully traverses through all of our custom field inputs and displays each that we have added. Rather than adding multiple lines of PHP we have coded it so that PHP loops through each custom field and displays them as an un ordered list. Our post now looks like the image below after being published:

This type of code can be combined into a function and later used as a short code to include inside our main editor rather than adding specific code to your single.php file. That type of concept is better saved for another blog post.
How to Hide Custom Fields from Your Users
Open up your theme’s functions.php file and add the following:
add_action('admin_init','remove_custom_meta_boxes'); function remove_custom_meta_boxes() { remove_meta_box('postcustom','post','normal'); remove_meta_box('postcustom','page','normal'); }
Display Custom Header, Footer, Sidebar using Custom Fields
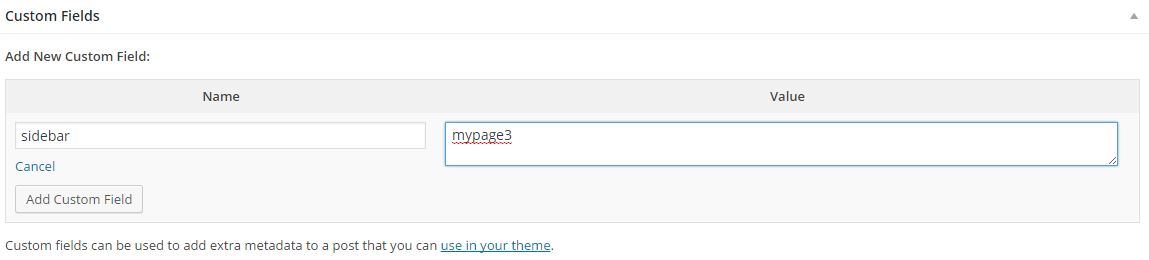
Header, Footer, and Sidebar stays the same for all posts and pages in WordPress. Well, if you are creating a custom design and want to have different sidebar, header, or footer for each post, then it is possible to do so with custom fields. In this example, we will just replace sidebar as an example. You will need to open yoursingle.php or page.php file and find the following code:
<?php get_sidebar(); ?>
Replace it with the following:
<?php global $wp_query; $postid = $wp_query->post->ID; $sidebar = get_post_meta($postid, "sidebar", true); get_sidebar($sidebar); wp_reset_query(); ?>
Now when you are writing a post or a page, and you want to display a custom sidebar all you need to do is add the custom field “sidebar” and include the name of the sidebar file. For example if you insert “mypage3”, it will display sidebar-mypage3.php as your sidebar.
You must have the file already in place to call it from a specific post. This trick is mostly used in larger magazine style sites, but it is commonly used for custom pages also. One of the easiest way to start out creating a new sidebar file is copying yoursidebar.php codes into this new file and edit/add the codes that you want.
You can use the similar technique to replace header and footer.
Conclusion
Custom fields are limited to your imagination only, so there are tons of cool tricks that we might miss. You can dig it by yourself. And there are also a lot of plugins about custom fields you can have a try, they will be more convenient.